Ford Mustang Boss 302 and taking it for a spin


The Boss 302 Mustang was a Ford Mustang high performance variant produced in 1969 and 1970. It was produced for the Trans Am racing series, while the Mustang Boss 429 which was produced the same years was built around a larger engine. Ford has recently revived the Boss 302 for the 2012 model year.

about the enjoy-ment one gets from actually driving a classic Ford. Like many of you, my '66 Mustang coupe is just a simple and clean restoration with a few minor modifications and it has seen its fair share of road trips, cruises, car shows, and highway congestion. The same can't always be said for the more desirable and rarer breed of Mustangs, such as unrestored Cobra Jets, Shelbys, Boss cars, and the like. I can't say I blame these owners too much. Some of these cars are worth six times what my little coupe is worth and having that six-figure ride safely ensconced in an enclosed car trailer certainly must put the owner's mind at ease (and the owner's insurance company as well!). So it is a distinct pleasure when we get to meet someone like Jim Bridgett, who has no qualms about hopping into his '70 Boss 302 and taking it for a spin. Matter of fact, he stretches his Boss' legs at least once a week he tells us.

1970 Ford Mustang Boss 302 Passenger


The Camaro/Mustang rivalry had begun in 1967 with the introduction of the Chevrolet Camaro by General Motors. The Camaro was the largest threat to the lead Ford had in the "pony car" field, a niche of car manufacturing largely created by Ford with the introduction of the Mustang in mid-year 1964. Despite the lead Ford had in this field, the performance of the Mustang did not stack up to that of the Camaro. The small block and big block Chevrolet were more than a match for the 289 and 390 Fords placed in the Mustang. Ford, in an effort to burnish their "total performance" image introduced the 428 Cobra Jet in mid-year 1968, and in 1969, built one of Detroit's most interesting power plants, the Ford Boss 302 engine V8. The design was a composite engine using the "tunnel port" Windsor block and large Cleveland heads. The engine was fitted to Mustangs sold to the public to allow Ford to use the new engine to compete in the Trans-Am series.

1970 Ford Mustang Boss 302 Passenger Side Rear
Jim had wanted a Boss 302 since high school. Not being able to afford the insurance though, he settled for a Cleveland-powered '70 Mach, which cut the insurance bill in half. Jim sold the Mach in 1974, with the influx of the gas crisis looming, for a '74 Comet and its fuel-sipping inline six. The agreement he made then with his wife was that when the kids were all gone, he could get another "toy." That time came in 1999 when Jim purchased another '70 Mach. This one wasn't as well appointed as his first Mach, but it did have the way-cool Shaker hood option on the Cleveland-something he remembered seeing on that Boss all those years ago.

the Boss 302 Ford Mustang


The Ford entry for 1969 and 1970 was the Boss 302 Mustang. The factory effort was headed up by the famed Bud Moore, who fielded two cars in the 1970 season, and won the championship that year. The Bud Moore Mustangs edged out Team Penske's Javelins, and lead Penske driver Mark Donohue lost out to Bud Moore driver Parnelli Jones. Then, in 1971 AMC came out with a redesigned Javelin and returned to the track with ex-Mustang driver, George Follmer and Mark Donohue. With Mark Donohue behind the wheel of the AMC Javelin, the Mustang and others were beat in 1971, and again with George Follmer driving in 1972.

Although Ford's Drag Pack option with a special oil cooler was never formally offered on the Boss 302, it was often included with the 4.30:1 rear axle ratio. This coveted option is recognizable when the hood is opened to reveal Ford's vertically mounted oil cooler in front of the radiator

Jim found the Boss you see here in 2004 when the buyer contacted Jim about placing an ad in his Mustang club's newsletter to sell it (Jim is a member of the National Capitol Region Mustang Club, Bayside Mustangs, and the MCA). Instead, Jim purchased it. The seller even delivered it to Jim's Crofton, Maryland, home. The Boss's rare Bright Gold Metallic topcoat had been repainted sometime in the past, but other than some light detailing, the Boss was ready to go anywhere, or so Jim thought. It wasn't soon after that Jim was motoring his way downtown to display the Boss at the Washington, D.C. International Auto Show when its raspy 302 mill sputtered to a stop and fell silent. With little he could do on the side of the road, the decision was made to have the Boss towed back home to tackle the problem in his home garage.

The 1970 Ford Mustang Boss 302 is available


The Boss 302 is reproduced as a model and toy, with diecast models including Hot Wheels, Matchbox, and ERTL American Muscle. It is recognizable by the "hockey" side stripe, rear louvers and chin spoiler. The 1970 is available, but there are also some 4-headlight 1969 models as well.
Many "Boss clones" have been created out of regular fastback cars due to the expense of the original automobiles.
In 2007, a pair of restored 1969 Boss Mustangs sold for $530,000.

Time flew by, as it so easily does for all of us, and the car ended up being stored for the winter. It wasn't until the spring of 2005 that Jim was able to get under the hood and figure out the problem, which was lack of fuel delivery. It turns out there was sufficient sediment in the original tank (upwards of an inch thick!). The crud got sucked into the fuel line and fouled the filter and carburetor, completely plugging up the fuel system. This caused the car to not only quit, but not restart either. A new reproduction tank was ordered from Virginia Classic Mustang and the Boss' original 780-cfm Holley was sent off to Pony Carburetors for a complete rebuild and tuning. Once the new fuel tank and refinished Holley were bolted back up, new filters installed, and the fuel lines blown out, the Boss once again came to life with the twist of Jim's ignition key; ready for more driving.

Falcon Red fox


The story of the Falcon in Argentina began in 1961 when Ford Motor Argentina imported two Falcons from the US to test.
First Argentine Ford Falcon
In 1962, local production began with complete knock down kits imported from the US assembled at the Ford factory in La Boca. Only a sedan was offered, with Standard and Deluxe trim levels, and a 170 cubic inch Ford Straight-6 engine. The official unveiling of the Falcon to the country took place in the theater "Gran Rex" in February 1962.

The Ford Falcon Argentine


The Argentine Ford Falcon is a car that was built by Ford Argentina from 1962 to 1991. Mechanically, it was based on the Ford USA's 1960 Falcon. The Falcon retained the same elegant body style throughout its production, with several substantial face lifts taking place during its lifespan, giving it a more European flavour and bringing it into line with other more contemporary Fords. However, several decades later it was apparent that it was a 1960s design wearing a 1980s grille.

The robust Ford Falcons became popular as black and yellow taxi cabs and black and blue police vehicles, with the green painted Falcons used by the secret police of the military junta of the 1970s associated with them to this day.
Falcons are still raced in the Turismo Carretera stock car racing series.

4-speed transmission the Ford Falcon came


The first restyle of the Falcon came in 1963 and was produced until 1965. The Falcon now had a horizontal aluminum grill. New models included the Taxi model in 1964, and the Futura in 1965, with a vinyl roof and bucket seats. A larger and more powerful 187 c.i. engine was available. More parts were manufactured locally.

The second restyling of 1966 brought a more ornate grill, hood and side panel ornamentation. Most parts were now locally produced. In 1968, the new Falcon Rural station wagon model began production, with its own Futura and Deluxe variants. High compression engines producing more power were available from 1968, and in 1969 Ford introduced a higher performance 3.6 litre 132 hp engine that became available as an option (model 221XP), it employed a freer-breathing cylinder head and less restrictive exhaust system to boost power. A floor mounted 4-speed transmission became available for the first time

The Alfa Romeo Giulia Ti Specifications


Specifications
Vehicle Type: 4-door sedan
Configuration: Front Engined
Engine(s): 1570cc
Wheelbase : 2540mm
Width : 2510mm
Height : 1430mm
Weight : 2156lb

Alfa Romeo Giulietta Ti launched in 1962


This page should allow any Alfa Romeo Giulietta Ti owners or enthusiasts a quick and easy reference and a place to share pictures of Alfa Romeo Giulietta Ti 's.

Technical specifications are also listed on this page as are Alfa Romeo Giulietta Ti 's for sale, Alfa Romeo Giulietta Ti spare parts and Alfa Romeo Giulietta Ti books and memorabilia. If you cannot find what you are looking for on this page then feel free to use the Goggle Search feature below to search the web for more Alfa Romeo Giulietta Ti information.

1962 Giulia Ti


The Giulia Ti was launched in 1962, it was powered by an Alfa Romeo Twin Cam engine with a capacity of 1570 cc that delivered an output power of 92 bhp. At first, the Giulia Ti was only available as a left hand drive. Right hand drive models were not produced until 1964. Drum brakes that had been used in previous cars was replaced by disc brakes with a servo mechanism.

The production of the Giulia Ti stopped in 1968 and it was reintroduced as Giulia 1600 S.

Good Solution For Setting up and tuning SU carburettors

SU Carburettors
The SU carburettor is a relatively simple design but has proved to be very effective. The often underrated SU offers good versatility and reliability.
SU carburettors can theoretically perform better than modern computer controlled fuel systems. This is due the SU being analogue and the vast array of needle profiles available.
Inside the body of the carburettor is a piston, which reacts to the rate of air flow into the engine. Attached to the piston is a tapered needle which alters the amount of fuel delivered as it rises and falls. This combination provides variable amounts of fuel and air to cope with the demands of the engine under changing loads.
SU carburettors are very simple to adjust, but please resist the temptation to fiddle with them unnecessarily.
If your engine is not running correctly, always check your ignition system first of all as this is the problem in most cases.
 Most engine problems are caused by incorrect timing or points out of adjustment. You should only adjust your caburettors when you are completely satisfied that the ignition system is working correctly (if you have a vacuum gauge fitted then you can tune your ignition timing as described in this article) .  Only then can you turn your attention to the carburettors.

Checking adjustment
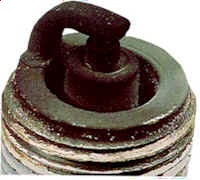
The colour of the spark plug electrodes and the colour of the exhaust tailpipe provides the most visible and easily checked guide as to how well your carburettors are adjusted. Take your classic for a run and thoroughly warm up the engine, then remove each plug in turn and compare the colour of its electrode with the chart below
Combustion deposits are slight and not heavy enough to cause any detrimental effect . Note the brown to greyish tan colour, and minimal amount of electrode erosion .
Mixture too Rich  
Rich Mixture
Soft, black, sooty deposits easily identify this plug condition. This is most often caused by an over-rich, air/fuel mixture.
Check for a sticking choke, clogged air cleaner, or a carburetor problem - float level high, defective needle or seat, etc
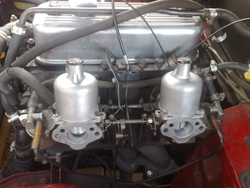
Carburettor adjustment
Twin SU’s are straightforward to set up, with just three main areas of adjustment.
These are:
  • synchronising the carburettors
  • adjusting the mixture
  • setting the idle speed
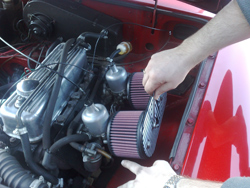
Before attempting to make any of these adjustments, start the engine and run it until it reaches normal operating temperature, then remove the air filters.

Remove the air filters

Synchronising twin carburettors
To achieve the best possible performance from your classic you will need to synchronise the both carburettors.

Start the engine and run until warm. You can then adjust the throttle idling screws on each carburettor to give the desired idling speed.  You should set the engine idle speed as low as possible, but keep it fast enough for the engine to run reasonably smoothly.

With the engine still running use a length of rubber tube to listen to the intake 'hiss' from each carburettor. Compare the hissing sound made by the air being sucked into each carburettor (It is important to be consistent about where you position the rubber pipe, when you measure the hiss from each carburettor in turn).  Carbalancer from Gunson provides a more accurate visual version using a flow meter and an adjustable head which fits into the throat of the carburettor.
Gunson Carbalancer

You should measure the hiss/flow and adjust the throttle screws until it is the same for each carburettor,   You can now adjust the idle speed by turning both throttle screws by the same amount. Once the desired idle speed is achieved it is worth checking again to make sure the flow rate is still balanced.

Adjusting the mixture
If a check of the colour of the spark plug electrodes reveals the need to adjust the mixture, now is the time to do it.
On most models, the jet adjusting nut is clearly visible beneath the body of the carburettor. Turning this adjusting nut upwards (tightening) will weaken the mixture and turning it downwards (loosening) will make the mixture richer. You can obtain an SU jet adjusting spanner to make this adjustment easier.  If your mixture is really badly adjusted you can tighten the adjusting nut up fully and then loosen it 12 flats of the nut. This will set your mixture to approximately the correct place.

On an HIF carburettor the mixture adjustment is by a cross head screw situated in a recess in the base of the body
On later cars, jet adjustment is controlled by turning a screw on the side of the body of the instrument. Turning the screw clockwise will enrich the mixture, while turning the screw in an anti-clockwise direction will weaken the mixture.
Carburettor lifting pins
At the side of each carburettor is a lifting pin, these pins enable you to check the movement of the piston.
Once the carburettors have been synchronised, the lifting pins can be used to check the mixture adjustment. Raise the lifting pin on the front carburettor to lift the piston by approximately  1/32 in (0.8mm).
  • If the engine speed increases, the mixture strength of the carburettor is too rich.
  • If the engine speed immediately decreases, the mixture strength of the carburettor is too weak.
  • If the engine speed momentarily increases very slightly then returns to idle, then mixture strength at the carburettor is correct.
Repeat this operation for the other carburettor, and after adjustment re-check the first carburettor, since both are interdependent to some degree.
If the exhaust note is irregular with a slight of misfire and colourless exhaust, the mixture is too weak. If there is a regular misfire in the exhaust beat, together with a blackish exhaust, then the mixture is too rich.
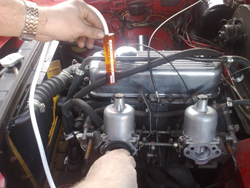

Damper oil
Top up each of the piston dampers with carburettor damper oil. Unscrew the damper cap, withdraw the damper and top up the reservoir until the oil level is 1/2 in (12mm) above the top of the hollow piston rod.

SU Carburettors

Float chambers
The float chamber of the carburettor contains a float and a needle valve. The float works rather like a ball valve (just like the one in your toilet). As the level of fuel in the float chamber falls, the needle opens and allows in more fuel. If the float sticks or becomes punctured, fuel will continue to enter the chamber and eventually pour out of the overflow pipe. Sometimes the needle valve itself can become blocked or stuck and will either not allow any fuel to pass or fail to shut off and fuel will overflow. Early cars will have the float chambers mounted at the side of the carburettors but on later cars the float chambers are built-in to the main body.

Butterfly valves
Some cars may have carburettors fitted with overrun depression limiting valves fitted to the butterfly or throttle disc. The idea behind these valves was to clean up exhaust emissions by drawing in more air on the overrun. If the springs become weak and the valves fail to close properly an erratic tick over with a rising idle speed will result. This can be remedied by replacing the valves with new ones or by reverting the earlier specification butterflies without the overrun depression valves (recommended)
[via: classiccarhub.co.uk]

1969 Cadillac Convertible Classic cars Wallpaper and info


The de Ville was originally a trim level and later a model of General Motors' Cadillac marque. The first car to bear the name was the 1949 Coupe de Ville, a prestige trim level of the Series 62 luxury coupe. The last model to be formally known as a de Ville was the 2005 Cadillac Deville, a full-size sedan, the largest car in the Cadillac model range at the time. The next year, the Deville was officially renamed DTS (an abbreviation standing for Deville Touring Sedan, itself a trim level on earlier models).

1969 Eldorado Convertible


The name "de Ville" (French: "of the city" or "town",) is a reference to the town car body style, which featured an open chauffeur's compartment and an enclosed passenger compartment. The term was also used by Lincoln in 1922, to describe a one-off model built for Henry Ford.[1] In Cadillac parlance, de Ville was first used to designate a deluxe trim level on hardtop or "pillarless"-body cars. At first, de Ville trim was available only on the Series 62, but pillared sedans were not available in de Ville trim until the 1965 model year, when de Ville became an independent trim line, including a convertible and pillared sedan.

1969 Cadillac Convertible Tuning


Beginning in 1965, de Ville denoted Cadillac's mainstream model, falling between the Calais and the Fleetwood.

All GM fullsize lines were completely redesigned for 1965, yet de Ville retained its 129.5-inch (3,290 mm) wheelbase. The Series 62 on which the de Ville was based was now called Calais. Rounded body styling gave way for sharp, angled lines. Tailfins disappeared, and headlights were now stacked vertically allowing for a wider grille. The pillared sedan variant returned. Power was still supplied by the 429 cu in (7,030 cc) V8, which was replaced by the 472 cu in (7,730 cc) for 1968.

For 1968, the de Ville gained slight exterior changes to comply with new federal safety and emissions legislation, and as with the rest of the Cadillac lineup, a new 472 cu in (7,730 cc) V8 engine rated at 375 hp (SAE gross). 1968 was also the last year for the "stacked" dual headlights, which were replaced with side-by-side dual headlights in 1969.

The 1966 Cadillac Convertible is "The mostwanted Calssic Cars"


The 1966 Cadillac Fleetwood Eldorado convertible had a 429 cubic inch, 340hp V8 engine.
This was the last Eldorado several years, and the last rear wheel drive Eldorado. It had the Cadillac crest on the rear fenders.